Hiring a professional photographer is the best way to capture impressive photos for your business – but it may not always be feasible. If you’re on a tight budget, you may not be able to afford the services of a photographer, but you will still need impressive business photos nonetheless.
The good news is that there is no reason why you can’t capture impressive photos yourself. Assuming you have a decent digital camera or smartphone, all you need to do is follow a few simple tips:
Make sure there is lots of soft light
Light will play an important part in how your photos turn out, and for business photos it is normally best if there is lots of light that is diffused so that it evenly illuminates the subject.
One good way to use natural light to snap impressive business photos is to position the subject near a large open window. Alternatively, you could look into rigging various types of DIY lighting solutions if you have the time and resources.
If you’re photographing outdoors, you may want to try to time your session to take place during the golden hour – i.e. the hour right after dawn, or right before sunset. The lighting conditions during that period are particularly good, and will help you snap really impressive photos.
Try to use the rule of thirds as a guide
To come up with business photos that have a better visual impact, you should try using the rule of thirds as a guide. It is easy enough to use, and you just need to turn on the grid feature on your camera and then line up the subject and other elements based on the gridlines and intersection points.
The rule of thirds will help you to place the subject slightly off-center and make it stand out more. On top of that, the other elements should be spaced out more evenly, making the photo look more balanced.
Get close or fill the frame
It can help to get close to the subject of your business photos, as it will reveal more details that may not have been visible otherwise. As a rule, you should always move yourself physically closer rather than using the ‘zoom’ feature – as it could affect the image quality.
In some cases, you may even want to fill the frame completely with the subject of your photo. The business photo that you end up with will look very interesting if you do, and it will make the subject the undivided focus of attention.
Be sure to snap lots of photos, and then go over them later. If you need you can use various tools to help you manage and organize your photos, such as Movavi Photo Manager for example.
By applying the tips listed above, you should notice a big improvement in the photos that you snap. Admittedly, they may not match the photos that a professional would be able to capture, but they should look good enough that you can use them for your business.
The more you practice using each tip and the more experience you acquire, the better you’ll get. That is the key to being able to capture truly impressive photos, and it could even turn into an enjoyable hobby for you to pursue.
If you are serious about online marketing, basic design skills are a must. Whether you want to make a few quick adjustments to a photo before posting on Facebook, or need to change a banner ad for your new campaign, Photoshop is the undisputed king of design software that will let you create virtually any look you want.
Photoshop is so comprehensive that it can be overwhelming to the beginner. With the ability to do just about anything, where do you start?
We suggest starting with the basics. Here are seven basic Photoshop skills you will use again and again as a marketing professional.
Using Layers
Layers let you move, arrange and edit objects and/or text independently. This vital feature is a super time saver. Knowing how to create, delete, group and merge layers lets you easily edit and repurpose your photos and other digital files.
Straighten a Picture
Using your own photos keeps you safe from copyright issues. However, it’s easy to snap a photo only to discover that it’s out of kilter. You can salvage crooked pictures in a flash with Photoshop’s ruler tool, once you know how.
Create Adjustment Layers
Sometimes you need to play with your design a bit before you come up with the right look. However, you might not want to lose the original. Instead of creating a lot of confusing duplicate layers, Photoshop lets you easily create an adjustment layer that lets you apply an effect, and toggle back and forth between options with a click of the mouse.
Remove Spots and Blemishes
Little imperfections such as pimples or stains can ruin the impact of what you’re trying to sell. It should come as no surprise that Photoshop has a tool you can use to make those annoying blemishes disappear. You can learn how to use it in two minutes or less.
Remove Red From Eyes
Sure, you might have stayed awake all night setting up your latest funnel, but there’s no reason to look like it. Just reach for Photoshop’s red-eye tool, and you can banish those flash photo demon eyes forever in about three clicks.
Isolate an Object
If you design ads, web pages or virtually any other piece of marketing material, you will often want to place an object over a different background, or eliminate the background altogether. There are a number of ways to do this. Some take hours, others only minutes. Needless to say, the sooner you learn the quick solutions, the better.
Apply an Effect to an Object or Text
Photoshop offers a wonderful array of effects you can use to spice up any object or text in your design, including drop shadow, bevel, glow, and many more. Adding them is almost too easy — once you know how, you may need to hold yourself back from going overboard!
Get Started Learning Photoshop
Check out the slideshow below for step-by-step instructions on how to do all of the basic Photoshop skills in this article.
—————–
Author Bio: Rocco Lungariello is a Marketing and Social Media Content Creator at New Horizons. He has been generating content surrounding the IT Industry for more than four years.
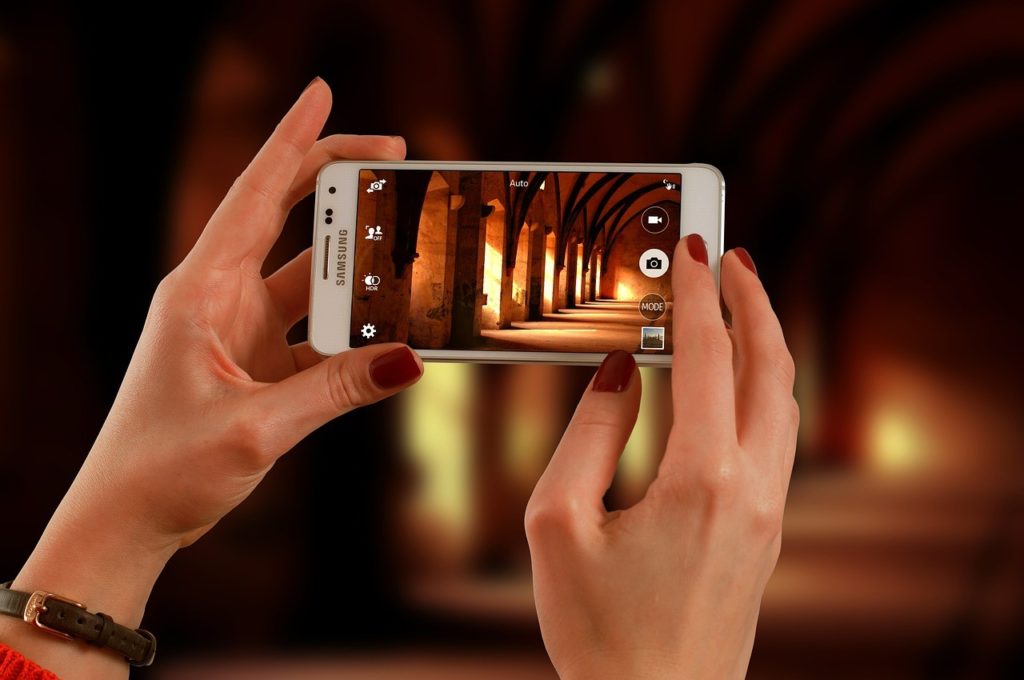
Nearly all of us take photos using our phone’s camera; those who don’t are likely pro photographers with separate professional DSLR cameras and some very bulky lenses. For the rest of us, taking a good picture depends on two factors: the quality of our phone and the right apps to fill in the blanks.
Buying a good phone isn’t the harder of the two things to figure out; most of the more expensive phones come with the better cameras. Assuming you’re at the second step, you’d probably like to know which apps to use so you can take awesome photos for your Instagram account or to keep to yourself.
Look no further; here are some great apps to make your photo dreams come true.
Android Users
Camera Zoom FX
Of all the photo apps available for Android, few come with higher recommendations from professionals and everyday users alike than Camera Zoom FX. With a host of features and a friendly interface, this app helps avoid common pitfalls that default apps frequently leave our cameras suffering with, including:
Reducing blur with image stabilization
Maximizing resolution with your phone’s megapixel count
Dozens of filters and frames for altering a photo’s mood
Moreover, Camera Zoom FX also hosts one of the simpler control schemes, complete with voice activation and full manual DSLR options to make your camera work overtime. The professional version only costs a few dollars, and it’s sure to be a purchase worth your while. In 2014, it was Lifehacker’s choice and remains the favorite of millions to date.
Open Camera
As a huge fan of open source software, I can’t recommend Open Camera enough because it truly has the best interests of its users in mind. With full support for Android’s Camera2 API, it hosts a variety of features that seem to be growing with every passing day. Its open source nature means that the only limits the app has are the ones you impose on it.
Like Camera Zoom FX, Open Camera allows you to adjust ISO, exposure time, and focus distance manually. It also allows for GPS tagging when you take a shot and comes with a considerably better price tag: free! The downside may be that it seems to have fewer effects, but as an open source app, that’s always something that can be added down the road.
PicSay Pro
Sometimes taking the picture isn’t enough. Having a good photo editing app can complete your photographic masterpiece, and you won’t find one much better than PicSay Pro on Android.
With most of the features that a desktop photo editor has, PicSay Pro allows you to fix issues with red eye, sharpen blurry shots, and apply numerous effects and edits to spice up otherwise dull images. The free version has quite a few options as well, but with the pro version you get a much more complete package.
iOS Users
Camera+
Not only is Camera+ an old staple, it also continues to dominate much of the iPhone photo world because it really does work that well. Thanks to Camera+’s manual option, you’ll have considerably more control over how your photos turn out. Even if things don’t look so great at first, the post photo touchup tools are enough to bring any picture you take back to life.
For Apple Watch users, there’s also support for controlling your camera from a distance.
Manual
Users seeking a cleaner, yet more technical, camera app might consider using Manual, as it not only allows you to take total control of your shots, but it also allows you to look at past photos to see the settings you were using at the time. This can be especially useful as you learn to make your phone’s options work for you.
Notably, Manual remains one of the easier to use apps despite having unique technical options.
Snapseed
While it might seem a tad ironic that one of Apple’s best photo editing apps is published by Google, it doesn’t make Snapseed any less powerful. Snapseed is one of iOS’s most popular apps for good reason: It’s easy to use for beginners, yet has features that can be fully put to work by more professional photographers.
Its filters focus on classic, tasteful touchups rather than cheesy effects. As with any editor, it has all you’ll need to fix up color distortion, sharpness and the dreaded red eye.
Best of Both Worlds
Just because Android and iOS run on separate platforms doesn’t mean there aren’t apps that work for both. For those with more than one type of device, it’s nice to be able to transition using the same app on both platforms.
Instagram
Despite being predominantly a social media platform, Instagram has really made strides since its inception in 2010, both as a powerful source of influence in the fashion world and as a genuinely decent camera app.
While Instagram may not be quite as potent as some of the more focal camera apps, it still offers enough filters and effects to liven up your photos. More importantly, Instagram also makes the transition to sharing your works of art with the world that much quicker. If you haven’t tried using Instagram for photos, it’s worth a shot.
ProShot
As versatility goes, ProShot has quite a bit to offer. Not only is it available for iOS and Android, but it also works for Windows devices as well. Like the other services above, it has all the manual options available (ISO, etc.) but also an in-between setting for convenience and less advanced users, which they call “semi-manual.”
While not specifically for photography, I’m a big fan of ProShot’s video options, which support up to 4K quality and even have options for dealing with audio problems.
Adobe Lightroom Mobile
It should come as no surprise that Adobe continues to be one of the best photo editing apps out there. With loads of professional options, Lightroom is especially unique because it works together with Lightroom CC, another excellent tool to use if you bounce between your camera and your PC.
But don’t let the integration keep you from thinking the app itself isn’t feature rich; most of what you’ll find in Lightroom CC is in the mobile version, from gradient alterations to dehazing. The only real disadvantage is the cost, as Adobe runs this app on a subscription.
Final Thoughts
There are many ways to improve your phone’s camera. Camera apps and photo editing apps are a great way to do it on the cheap, particularly if you’re not interested in buying a third-party lens.
Just don’t forget to protect your device. Particularly if you’re using your phone in an urban setting with tons of free WiFi, you should also consider a Virtual Private Network (VPN) to keep your photos secure. Public WiFi is practically a nesting grounds for hackers waiting to steal valuable data, and your photos could be a prime target. Using a VPN ensures you won’t lose out on hard work by encrypting your internet connection and keeping criminals out.
Have thoughts about mobile photography? Tell us how you take great photos on your phone in the comments section.
————————————-
Author Bio: Cierra enjoys taking photos on her phone daily. Between playing with filters and settings, she also writes about internet security and how best to take care of your devices and accounts in an increasingly mobile world.
Web design is an extension of page design, and when it comes to page design, there are plenty of rules and principles for putting together a winning website. Landing pages can be tricky; they have many elements to them that require careful consideration;
The main headline
Subtitle
The call to action button
Social Proof
Dedicated content
The form and fields people need to fill in
and of course the main hero image
While each element is equally important and cannot work without the other, the image and the colors we use on our landing page have the largest impact on our customer’s initial impressions of us, their experience and as a result, our conversion rates.
Since our brains process images much faster than text, the first thing our potential customer sees on the landing page is the image and it is all that’s standing between your customer bouncing from the page or choosing to read more or convert.
How to choose an image strategy for your landing page
The main hero image is meant to help potential customers see the value in our offer within the first couple of seconds, understand what’s in it for them and why they should take the next step in our customer journey vs. the competitor’s.
On average we see between 4000-10,000 messages a day, we’re constantly bombarded with ads, text messages, calls and content everywhere, the possibilities and options online are endless and tiring.
This is one of the main reasons potential customers easily and almost automatically navigate from one site to another without giving as much as thought for the page they just visited. As consumers we move quickly from one competitor to another until something clicks in our brain and catches our attention. That something is the value, the “What’s In It For Me?”
To stand out from your competitors and gain your customer’s attention (therefore increase conversion rates), the hero image on every landing page, email campaign and especially your website should project immediate value to your customer.
This isn’t an image of your product, service or features, it’s an image that highlights the emotional value customers gain from being your customers (e.g increase self confidence, get appreciated by your boss or find true love). As I mentioned at Mozcon, insurance companies don’t sell insurance policy, they sell peace of mind; a happy carefree family.
While most landing pages show an image of the product, platform or service they’re providing, we’ve ran countless tests proving time and time again that value wins almost every time.
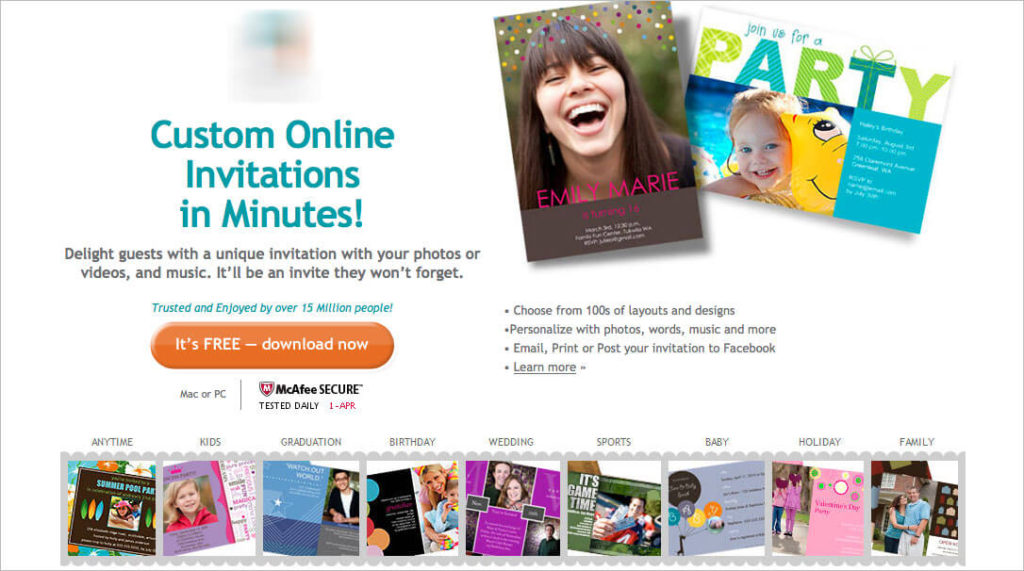
For example, this company provides an all-in-one solution for creating birthday and party invitations. While the original landing page featured images of the different templates available and featured a product focused headline: “Custom online invitations in minutes”
The variation we created visualized the party scene for our potential customers. Utilizing different colors to enhance certain feelings, an image of the park, a picnic basket and a dog this variation focused on helping people envision the perfect party, which starts with a great invitation. The results: 65% uplift in purchased subscriptions!
Today, I’m going to show you exactly how to do that yourself.
There Are 3 Ways to Define Your Image Strategy
Before setting down to design your landing page and randomly choose your image, take some time to follow the 3 step process we use to define the customer’s value and the images we want to test:
Step 1: Talk to your customers
The great thing about talking to customers is that they have all the answers. They know why they purchased an item or service and have a clear reason for doing so. However, most customers will give you a list of tactical reasons for their purchase. This happens due to our brain’s tendency to rationalize our purchases, we may purchase on emotion but our brain quickly finds a way to rationalize that decision. For example – buying an expensive suit, or that lamp you don’t really need is then explained by attaining a good deal for it or your sudden need for more light around the house.
So a great way to discover your value and avoid technical answers is asking them how they would feel about removing certain items from your stock or certain features from your platform. This will give you a clearer understanding of the real value people find in your service. You can also ask what may have stopped them from converting and more importantly, ask them about THEM: What are their dreams, aspirations and even what scares them – get to know them so you can offer relevant, more compelling images, colors and content.
Talk to your team
Your customer success team, your sales team and anyone who talks to your customers on a daily or weekly basis can provide key insights. They know what people complain about, what their main issues are and what people find exciting. Talk to your team, interview them and learn how they view the customer, what values they believe you offer and compare these to your customer interviews.
Analyze direct and indirect competitor sites
NO I’m not suggesting you copy from your competitors in anyway. What I am saying is that you should analyse the testimonials and especially the reviews found on your competitor’s site. This comes straight from Joanna Wiebe’s research process: See what reviews customers are leaving, what bothers them and what they care about to discover what you need to highlight on your landing page and what value you should focus on.
—
Once you’ve compiled all this data together you’ll be able to define the image strategy you want to test. The next step, is finding these images that highlight the value and have all of the qualities you’re looking for. Below are 6 rules you should follow once you’ve defined you’re strategy and ready to choose an image for your landing page:
6 Rules for Choosing a Landing Page Image
#1 Use Real, Relatable and Authentic Images
A successful image is one that your customers can to relate to. Either by seeing themselves in the image or someone they would want to be like, someone that reflects their challenges and values, or someone they can and want to connect to.
Use authentic images of people and avoid ones that are clearly stock photos, bought for the sake of the page. Best case scenario – use real images of your customers or your team, if you can’t use those choose your images wisely. A quick google images search can show you how many companies are already using that image. Ask yourself, is this image authentic? Will my customers relate to it? Or does it look like this (in case this isn’t clear –> this is a bad image!):
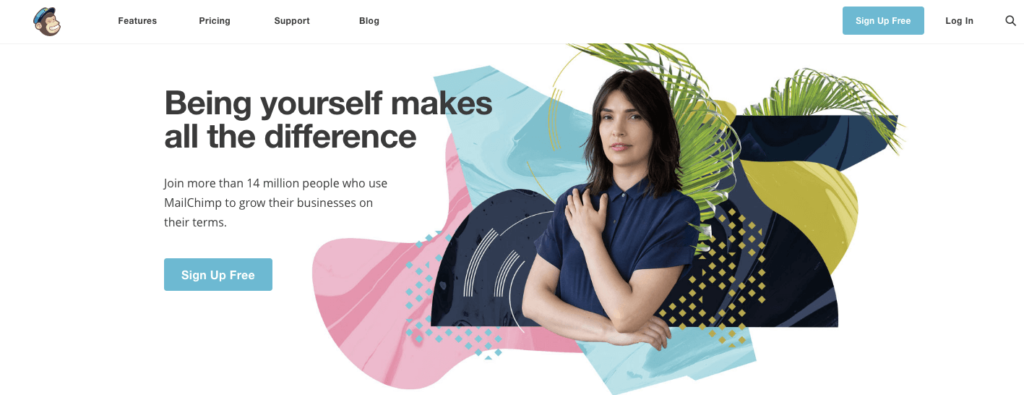
Mailchimp’s new homepage redesign (launched just a few weeks) ago baffles me. The image is clearly a stock photo image (if not… then bad execution) that feels cold and has no relation to their headline “Being yourself makes all the difference”. Does this image represent their target audience? The colorful background with different shapes, colors and palm leaves distracts the customer and has no value that I can personally detect. As a Mailchimp customer, personally I don’t feel comfortable with this women staring me in the eye and telling me to be myself. This image feels fake and I have a hard time relating to it in anyway.
Gusto on the other hand, has an image of a women sitting in front of her desk smiling. Now, granted I don’t really know if this a real photo of an HR person or a stock photo but it feels real and the connection between the image and headline is clear. I can immediately resonate with it, it’s authentic and relatable to HR personnel who do it all. Gusto makes the main image work with the strategy of the page, makes it about the customer and as opposed to the lady staring at us from Mailchimp’s new design, this women doesn’t feel alienating – she feels welcoming, someone you might want to meet. This is the difference between using authentic images that relate to your target audience vs. images that just look nice and have a “cool” composition.
#2 Reduce Visual Noise
“With great power, comes great responsibility” – As we’ve seen, our image captures most of the attentive mind of our landing page visitor, it’s almost always the first thing we see and it’s what determines if we should hang around a take a few more seconds to read and understand the offer. This means, that other than choosing a good strategic image, we also need to think about reducing the noise it creates so it doesn’t have a negative affect. We need to make sure it’s easy for customers to quickly see what’s in it for them and asses our services. How do you do that? By following these 3 simple rules:
Ensure high contrast between the image and the page content so it doesn’t “drown” out the text, making it hard for people to read, like this for example:
Ensure the photo is distraction “clean” as possible and helps customers focus only on the most important elements of it unlike the landing page below for example. There’s so much going on within this image that it’s hard to focus on anything. Not to mention the fact that this is yet another common image used by thousands of startups to show another “unique” office space. This image has nothing to do with the service. How exactly does an image of random people in an office make you feel that this a “new model for talent development”? Clean images, mean using only the objects that help get the message across, remove any details that can cause confusion or stress on the eyes.
Consider the colors you use – colors have an emotional effect on us and can assist us in saying things without actually spelling them to people. For example, you don’t have to say you’re trustworthy, you could (in Western cultures) use blue for that. Also, remember to reduce the amount of colors you use so it’s easier on the eyes and easy to take in.
#3 Use Images as Direction Cues
Our main image is there to create a certain atmosphere and feeling, but it’s also there to navigate the customer in the right direction and point them towards the next step (whether it’s subscribing, downloading something or simply reading more). You can use your main image as a directional cue to show people what to do next like the visual below.
You’ll notice that all elements (computer, paper, earphones and pens) are placed around the call to action button making that the main focal point of the page. Granted, I’m not sure this is the best image to use to sell a UX class, since it’s only showing specific elements you’re going to use during the course, but doesn’t explain why you should actually take it. However the placement of elements is done well.
Perhaps a better example is by ‘Here One’. As you can see they’re using their main character (seems authentic and wearing product) to point with his entire body towards the call to action button.
#4 Avoid carousels and auto play videos
While tempting, carousels confuse visitors and make it hard on them to focus on the action they need to take so don’t use them. This is actually a well known fact and many case studies have shown that rotating images reduce conversion rates. And so do automatic background videos! instead of reading your content and taking the next step, the visitor is now engaged in a moving video that’s distracting and has nothing to do with your goal. Have multiple images in mind? Test them, don’t use them all at once.
#5 Consider Mobile
Just because an image performs well on desktop, does not mean it will work or look well on mobile. First, you’ve got the fact that technically the image may look bad on mobile:
It may look stretched
Take too long to load
Completely dominate the page
Move all your content below the fold
or simply won’t make sense to a visitor on mobile.
Let’s look at the same example by ‘Here One’: it looks and works great on desktop. However, on mobile it’s a different story. The image of the guy and the colors they’re using make it hard to read the text. It’s not immediately clear what this product is and could be perceived as a hearing aid rather than advanced, cool earphones. The strategy of this image, doesn’t work well on mobile.
#6 A/B test your Strategies
Once you have an hypothesis for your image strategy, take the time to test it vs. the one you already have. In fact, test different strategies, for example an image of your product or someone using the product vs. an customer centric image. This is not only a great way to validate your hypothesis but also a good way to show numbers, figures and facts to your team who might have a hard time getting behind this new initiative. A/B testing image strategies instead of just simple elements such as the color of the call to action button will give you greater insights that can then be presented to your team for convincing them to get on board.
Image Checklist
Use the following checklist and process to define the images for every landing page, email campaign or website you launch:
Define the goal of your page (e.g – subscribe, download)
Evaluate current image strategy (Does it highlight the customer or yourself?)
Use heatmaps to determine current image (e.g – is it a focal point, are people clicking on it)
Conduct customer surveys
Conduct interviews with team
Analyse competitor websites for reviews and testimonials
Combine all data to define a customer centric image strategy
Choose image (using the 6 rules)
Launch A/B test of current variation vs. new variation
Over to You
Remember that the image doesn’t work alone, it’s part of a whole composition working with the copy, your fonts, colors and call to action button. All elements together should be geared towards helping the customer immediately seeing what’s in it for them and helping them take the next step.
Talia helps businesses plan and execute conversion optimization programs. She runs thousands of A/B tests using emotional targeting and persuasive design to grow their business.
Talia is a frequent keynote speaker at marketing conferences and was recently listed as one of the most influential experts in conversion optimization. Follow her on twitter at @taliagw and learn more about her conversion optimization training programs.
Major fashion retailers now use Instagram to source niche brands to service customer demand. Take Selfridges, the iconic British department store chain. Instagram has been key to the brand stocking its “Everybody” section, a specialist fitness brand section. Its buyer’s source boutique labels such as Kiini (which does a range of crocheted swimwear) and the Muzunga Sisters (who do a range of beach cover-ups with pom-poms) by viewing Instagram content. For Selfridges, sourcing niche brands on Instagram is about buying into a particular lifestyle to best serve its customers.
Major high fashion luxury brands now use Instagram to create brand awareness and engagement online. Take Chanel as an example. For the French brand’s Fall 2015 fashion show, Chanel erected an over-the-top set design, a supermarket with 100,000 faux Chanel products on the shelves. Audience members were given access to take ‘supermarket selfies’ on the set prior to the show. One image posted by the fashion blogger Susie Bubble, who has more than 272,000 followers on the social platform received more than 2,670 “Likes”.
For more insights into the power of Instagram and its influence over the fashion industry, have a look at this infographic created by Evoke.ie
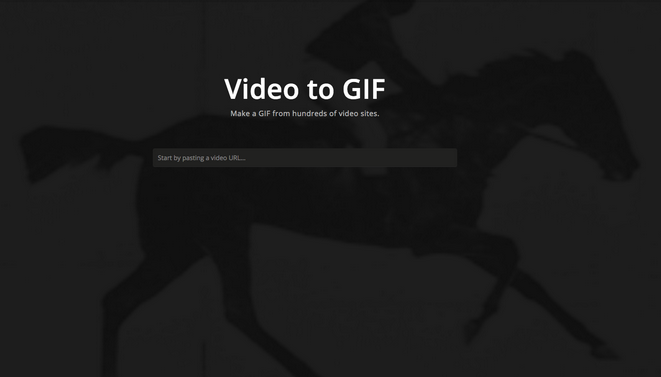
GIFs are the internet. Wherever you go across the net, you see a lot of crazy photos posted all over web. Whether these are cats, dogs or any other pet you have, let alone extreme and funny activities or just a crying newborn baby take– It’s all there. And people like GIFS, really, they do, but what is the most convenient way to make one? There are many tools to create animated GIFs online, that can easily be found on the Internet by doing a simple search on Google.
Imgur, the popular photo sharing service, today released another tool to the pond, but not JUST another one, if you will, but more like the easiest of ’em all. Yeah, the online tool (sorry, mobile users but service is currently only available on the desktop site) which goes under the name Video to GIF will help you turn a video into a GIF image by simply copying the wanted URL address from a wide range of popular video websites directly into the given input window. From there on, when you’re surfing in the following link (imgur.com/vidgif) just click and drag to set your start time and drag to adjust the total runtime, rightly after. You can add any text at your choice if you want and then choose the “Create GIF” option to officially start the process.
The tool is not perfect, but yet allows us to create some truly beautiful high-quality GIF images. Sometimes it will save the file into a .gif and in some other occasions will push it into Imgur’s GIFV format in the form of a .gifv extension.
Instagram has recently released Hyperlapse, a standalone app for taking time lapse videos on the iPhone and iPad devices. The app which already ranks #3 on the Apple App Store, is a very simple, yet sophisticated tool that lets you capture high-quality time lapse videos at a lower frame-rate than usual, but with a built-in stabilization technology that lets users create moving, handheld time lapses at a glance. Simply open up the app, tap to record video, and then choose the video speed, which can be varied from 1x to 12x, and tap again to end the session. Videos are given the opportunity to be shared directly to Facebook or Instagram.
We designed Hyperlapse to be as simple as possible. You don’t need an account to create a hyperlapse. Instead, you open up straight to the camera. Tap once to begin recording and tap again to stop. Choose a playback speed that you like between 1x-12x and tap the green check mark to save it to your camera roll. You can share your video on Instagram easily from there.
Instagram says that inner technology behind the Hyperlapse app is based on a video stabilization algorithm called Cinema, which basically helps us regular users to smooth our shaky videos out in a snap, and make them look very slick and professional. It’s like a “$15,000 video setup in your hand” said Wiredand we couldn’t agree more.
[vimeo id=”104409950″]
We also witnessed a few popular brands and institutes that immediately decided to try the new app. It’s definitely a risky move from the marketing perspective, but you should know that whether you win or lose, at least you’ve done your best to engage with your audience in a fun and creative way.
Here are 13 brands already using the Hyperlapse application:
MERCEDES
Bud Light
THE WHITE HOUSE
Sonic Drive-In
NAKED JUICE
Polyvore
Sydney Opera House
Burton Snowboards
Taco Bell
Mountain Dew
Drink Arizona
Foot Locker
COSMOPOLITAN
If you have stumbled upon any other great examples of brands using Hyperlapse, please post them in the comments below.
Yesterday, a friend of mine was asking for my help. He was going through a simple iphone restoring process (from his iTunes backup) but, alas! when he finished the update he was surprised to realize that all of his photos had gone missing. Thankfully, he had a second backup of the iTunes backup, and all he had wanted was to upload those pictures back onto the Camera Roll.
Sounds very easy, right? Well, not exactly. When you sync your iDevice with iTunes, you can easily add or remove your photo albums back and forth. However, it does not export directly to the Camera Roll. iTunes just doesn’t let you transfer your photos in there, but in whatever album you had organized them into.
Camera Roll is like your temporary portable SD card, which needs to be cleaned up and wiped off from time to time. You can easily import photos from the Camera Roll directly to your desktop or laptop computers, whether via Apple’s iTunes or some other popular software solutions such as the iPhoto for Mac. Normally, it would let you sync in one direction, then you make a backup of your personal media libraries from your desktop to external hard drive storage.
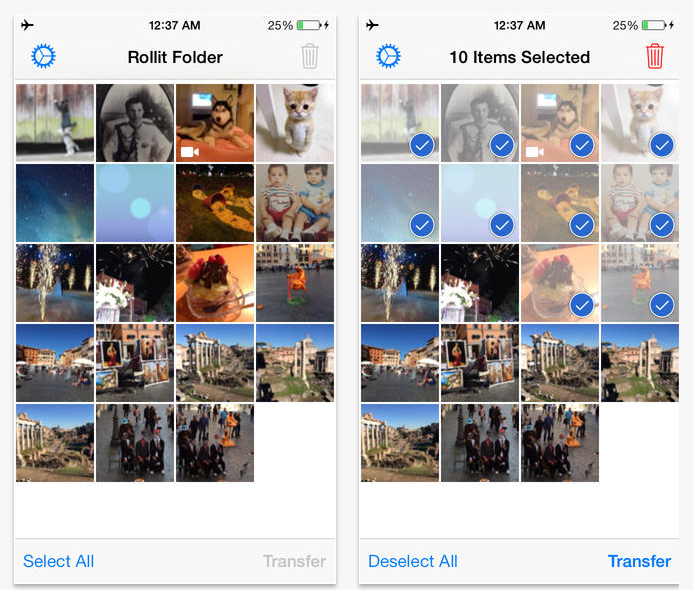
But what if you insist to get your photos back to the Camera Roll? Well, that’s where you may have a problem. If your iTunes backup simply doesn’t work, you’ll need to find a different third-party solution. And that’s where the Rollit app can come to your help. It would clean up the mess of transferring photos or videos from your average desktop onto your personal iPhone, iPad or even your iPod — All of that in a matter of seconds (the total time taken may depend on the size of your album)
How does it work?
The app works through a regular USB connection which is 3x faster than your average WiFi connectivity. Simply connect your USB compatible device to your personal computer (no third-party software is required), fire up your iTunes, pick up your iDevice from the top menu bar , then choose the “Apps” tab page and scroll all the way down to the File Sharing area. Now, click on the Rollit icon to your left, hit the “add” button and choose any photo or video that you are interested in adding to your iOS device. At this point you need to mark them all (there’s no limit of size or number of transferred items and the app supports a wide range of multimedia formats, including jpg, gif, png, tif, tiff, bmp, bmpf, ico, cur, xbm, mov, mp4, m4v). Now that you have chosen the files, you can easily add them to the Rollit area where it will auto-sync with your Cupertino gadget. Select the items that you’d like to transfer to the Camera Roll, click the “Transfer” button aannd DONE! Your items will immediately show up again in your iphone/ipad/ipod’s Camera Roll. That easy. The app retains all the data, including metadata like Exif information or geo-location, and the media will be transferred in its full quality.
The app is $1.99 U.S., but here are 12 promo codes to the Technologer community. Enjoy!
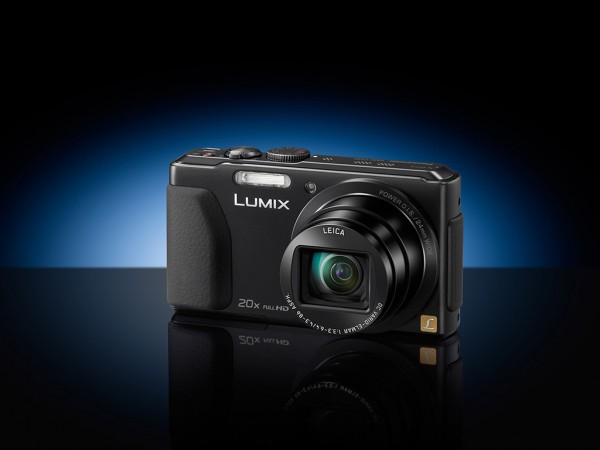
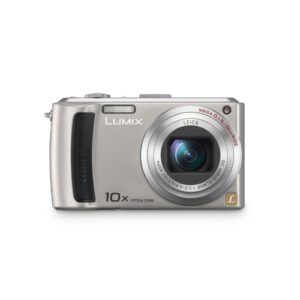
It’s a challenge to try to keep up with all the latest technology and gadgets that come on the market these days. There’s just plenty of them out there, but when it comes to digital cameras, brand is of utmost importance. In that regard, it will be safe to say that Panasonic is hands-down, one of the top photography brands. The company is well known for making cameras that have plenty of features and great eye-caching goodness, without hurting your pockets.
The new Panasonic Lumix DMC-TZ40 (known as the DMC-ZS30 Stateside) is one of their latest offering in the digital camera range, that is considered to be professional, but still budget-friendly, for the most part. This compact super-zoom camera features a powerful 20x optical zoom with a 24 mm wide angle lens from LEICA, which gives incredible magnification. The 3-inch LCD touchscreen on the back, comes equipped with a resolution of 920,000-dot pixels, and the camera includes the new 18.1MP high-sensitivity Live MOS sensor under the hood, capable of capturing more details than before. In addition, the TZ40 sports supremely quick continuous shooting, at 10fps with autofocus, and you can also shoot stunning 1080p Full HD videos at 50fps to 640 x 480 VGA quality at 25fps (either with AVCHD or MP4 formats).
The Lumix TZ40 compact digital camera weighs only 198g and is housed in silver, white or black enclosure, at your choice. There’s also a 3D mode option in this nice little shooter, and some other neat features such as built in GPS, Panoramic capture mode, integrated WiFi connectivity, and NFC (Near Field Communication) technology for easy pairing with other gadgets, such as tablets or top-notch smartphones.
Other notable specs in this beautiful aluminium casing camera include up to 40x of Intelligent Digital Zoom, alongside Hybrid Optical Image Stabilization feature, and a wide range of full auto exposure modes, including Program, Shutter Priority, Aperture Priority, and full manual control.
It is priced at £329.99 / $399.99, but you now get a chance to win this superb camera, by simply following the simple steps right here on this page; however it’s for those in the UK who are over the 18 years old.
Instagram, the most popular photo-sharing service these days, has officially hit 80 million users who have uploaded more than 4 billion photos, since its launch in October 2010. Acquired by Facebook for a staggering $1 billion, the San Francisco-based startup behind the popular mobile photo application, was initially built for iPhone, and got extended to Android users in April of 2012.
Regardless of their popularity, If there’s one thing missing from Instagram, is a simple and intuitive web-based user interface. And while the company appears to be committed to find a decent solution for the average user, more and more third-party companies are jumping on the Instagram bandwagon.
To remedy this problem, we have gathered a list of eight Instagram web services to help you manage, sort, organize, and share your digital images, as the photo space heat up. Check it out after the break.
There’s much doom and gloom spoken about the effect smartphones have had on digital photography. Although the digital camera market was still worth £598 million in 2011, this is down by nearly a third from 2006, when it was worth £843 million.
Some speculators (probably with a vested interest in mobiles) are saying that they can hear the death knell of digital cameras: here’s an example:
“I can see no reason for people to buy a digital camera in a couple of years’ time as many people have already abandoned them. Why would you pay more, carry around two devices and go through all the pain of uploading photos when you can do all that from one device that you already own? I wouldn’t want to own shares in digital camera companies right now because their industries are about to get decimated by the mobile phone.”
But we ought to look beyond the bare stats and the ravings of “the end is nigh” brigade and those who want to make in your face headlines. As newer technology continues to improve the specifications of top-end equipment, measurements like megapixel density or the top level of optical zoom possible will become all rather meaningless those consumers who want a simple good quality picture from their phones or cameras, and then want to share them socially.
When mobile phones first had a camera built in them, in the 1990s, they were poor quality add-on affairs that were more gimmicky than of actual genuine photographic use. But how times have changed. The latest top of the range mobiles have quality optics and features that rival many entry-level digital phones. But is this trend going to continue, and what are digital camera manufacturers doing in response? In a word, learn.
The big change that made cameras in mobiles so popular was the ability to not only speak to someone, and text them, but to send them an image or a video of where you are and what you are doing, that they can receive and look at on their own phone, without having to rush to plug in a computer. While there will always be purists who will compartmentalise photography as something to be kept separate from day to day human interaction on the move, the bridge should be made between those who like to take decent (even artistic) photographs and videos, but who also want to share them quickly and simply with their friends, employers, whoever.
Camera manufacturers could choose to either invest in a web service that complements captured photos or video, or to focus on including new, innovative hardware capabilities and modifications, to retain consumer interest. And go beyond that. Actually win over people from mobile phone photography to digital camera photography.
One of the big pluses of cameras being included in almost all mobile phones is that it has opened up photography to a whole new swathe of people who probably wouldn’t have thought of themselves as photographers. Many of these new converts will actually begin to be drawn in to the world of digital photography and see that it is a medium in its own right, and not just an appendage to social networking. That means there’s a potential new set of customers for those digital camera manufacturers who can get on the beam and produce a quality digital camera, which will not only have more features than a mobile phone camera, allowing the user to grow with the product, but retain and even enhance the social sharing communication experience of mobile phones.
There is also the factor that some shots are so important that you may not want to trust mobile phone camera technology, but want to go with a dedicated camera to make sure that the shots will be the best possible and stand the test of time.
I’m thinking here of weddings, parties, even holidays. While a mobile phone with a camera can take a shot as good as an entry-level digital camera most of the time, what about if the conditions on the day mean that you need more than the built-in flash of the mobile phone camera? Or a stand/tripod? Or something to enhance a particular part of the composition? Indications are that for “important” photography, people will turn to their digital cameras, or buy one.
So what empirical evidence is there of the effect of the phenomenon of mobile phone cameras on recent digital camera manufacturers?
Canon, Panasonic, Olympus, Pentax and Nikon have in recent years launched a new kind of camera that matches the quality of lenses of a professional model with the sleek, light body of a pocket, point-and-shoot device. Although these mirrorless cameras aren’t a great deal cheaper than the professional digital single lens reflex (DSLR) model, they are lighter and more compact. More mobile phone like in fact.
A range of cameras launched in the past few months have for the first time included WiFi chips, making it possible for users to share their photos much as a smartphone user might. With this Samsung you can share images and videos wirelessly; instantly send a photo to another mobile phone using Bluetooth. Or rely on the Wi-Fi capability to email it directly from the camera or upload it seamlessly to Picasa, Facebook, YouTube, and samsungimaging.com. You can even upload a video you just shot to YouTube. Now that’s going to make mobile phone manufacturers sit up and take notice!
Panasonic too have entered this market with their Lumix DMC-TZ50. It will let you connect to your wireless home router or a T-Mobile hotspot to upload one or more photos directly to Picasa, Google’s integrated photo-sharing website.
While mobile phones may have a zoom feature that is likely to be a digital zoom, which is inferior in quality to the optical zooms found on digital cameras. In fact this advantage is being maximised by more recent digital cameras having astonishing optical zooms built in, on even very compact phones. Take the Nikon Coolpix 100 for example, with its x26 optical zoom. Or the Panasonic Lumix FZ series with a x24 optical zoom. Even more compact is the Panasonic Lumix DMC-ZR3 with a x8 optical zoom that will suffice for most shots for most people. If you want more the Lumix TZ30 has a x20 optical zoom.
Just as the camera gets smaller and more sociable, so will the mobile phone evolve and compete to incorporate features presently only available on a digital camera. The winner will ultimately be the consumer who will have more choice and more features, for both digital cameras and mobile phones with cameras, at competitive prices.
It’s been four months since Snapture released their first revolutionary iPhone camera application with the abilities to capture up to three frames in a row, take self photos, take photos in different sizes, get a digital zoom, toggle Auto rotation and more. Now we hear that Snapture steps up with the new Snapture 2.0 version, adding features like self timer, 4 color modes, a clean UI, and multi-touch gesture zoom, all for free, in case you have a jailbroken device. You can also go Premium for $7.99 and get free-ads application with the ability to view, enlarge and delete recent pictures directly on the viewfinder, thanks to the QuickView system. Checkout the video after the break.